5 Tips for Creating a Gallery Wall Like a Designer
- Jan 23, 2017
- 5 min read

(In the spirit of full disclosure, there may be affiliate links in this article, which means that I may get a commission if you decide to purchase anything through those links. I only recommend products & services that I use and love myself, so I know you’ll be in good hands.)
Gallery Walls. Gallery Walls. So many people ooh and ahh over them, but not many actually have them in their homes. Why? Honestly, it's probably because people don't know where to start.
We have 5 quick tips that will make you look at Gallery Walls in a whole new way. One that will give you actionable things to consider so you can have that designer look you always wanted in your home.

#1 - Look for Inspiration
There are all kinds of Gallery Walls inspirations. One of the best ways to get some ideas is to look on Pinterest. Do a search for "Gallery Walls", "Gallery Wall DIY" or even "Gallery Wall Inspirations". We actually have a Gallery Wall Pinterest Board where we've archived some great examples for you.

#2 - Make It Personal
Even though you're looking for inspiration, make your Gallery Wall personal. You want your Gallery Wall to be a reflection of you and your family. It can be individual items that represent each person in your family. It can be pictures. It can be a Monogram of your last name. It can be an heirloom or even a DIY project that you love. Make it something that has meaning to you.

#3 - Choose a Few Anchor Pieces
Here's where we start putting things into action. Pick out a few Anchor Pieces for your Gallery Wall. By Anchor Pieces, we're referring to larger items that will have more visual focus than others. These Anchor Pieces might be slightly larger in scale than everything else. For example, maybe it's a large Monogram of your family name, or a large window frame where you'll hang photos or some other type of large decor. Once you've determined those focal pieces, you can build your Gallery Wall around them.

#4 - Think About the Eyes
For a Gallery Wall to be visually appealing, it needs to be easy on the eyes. So there are a few things you need to consider when developing your Gallery Wall.
Scale
How big is your Gallery Wall? Do you need to fill the entire space or just part of the wall? If the wall is big, do you have enough large items to make it feel as if it's in scale? Too many small pieces will get lost on a big wall. At the same time, filling an entire space from floor-to-ceiling and wall-to-wall can make a space feel awkward and too busy.
Color
Are you going with a monochromatic theme? If not, try sticking to things that are in the same color family, even if they're different colors. Then go with a punch of color with one or two items. If you have too many jarring color changes, it makes it hard on the eyes.
Texture
Consider mixing elements like wood, fabric and metal. Make sure those items coordinate with one another, but giving some rich texture can make a Gallery Wall very interesting.
Variety
Do you have enough variety to your items or does everything look just the same. If you have an entire wall full of spoons, let's say (just for the sake of making a point), the wall will seem to have lost it's focus. There are a few exceptions to this guideline, though. We've seen well thought out walls that were done all in the same Monogram letter, for example. They were all in different sizes and colors and only took up a smaller space on a wall. In that case, it was very effective.
We also love to add different shapes and sizes to add Variety to a Gallery Wall. For example, Round, Rectangle, Square, Horizontal, Vertical and so forth. This will add a lot of dimension to your wall.
#5 - Laying Out Your Gallery Wall
This seems to be the place that most people stall. We're going to share one of our biggest tips for laying out a Gallery Wall, but before we do, it's worth noting some things to keep in mind that will help relieve the stress.
Mix up your elements
We mentioned this earlier, but consider using all different shapes and sizes to your wall.
Be fluid with your design
A Gallery Wall doesn't have to fit into an exact rectangle or square space on your wall. I promise, it will be OK if an edge of an item moves outside of your space. Offset items add more visual appeal.
Don't stress about Spacing
It's your Wall. It can be whatever you want it to be. Unless you it will drive you crazy that you're a 1/4" off on your Spacing, I promise, no one else will ever know. If you need it to be perfect, then by all means, create it to your liking. However, our point is that a Gallery Wall is a free moving piece of art that is subjective and personal. It's for you, not everyone else.
Now let's work on Laying Out Your Gallery Wall.
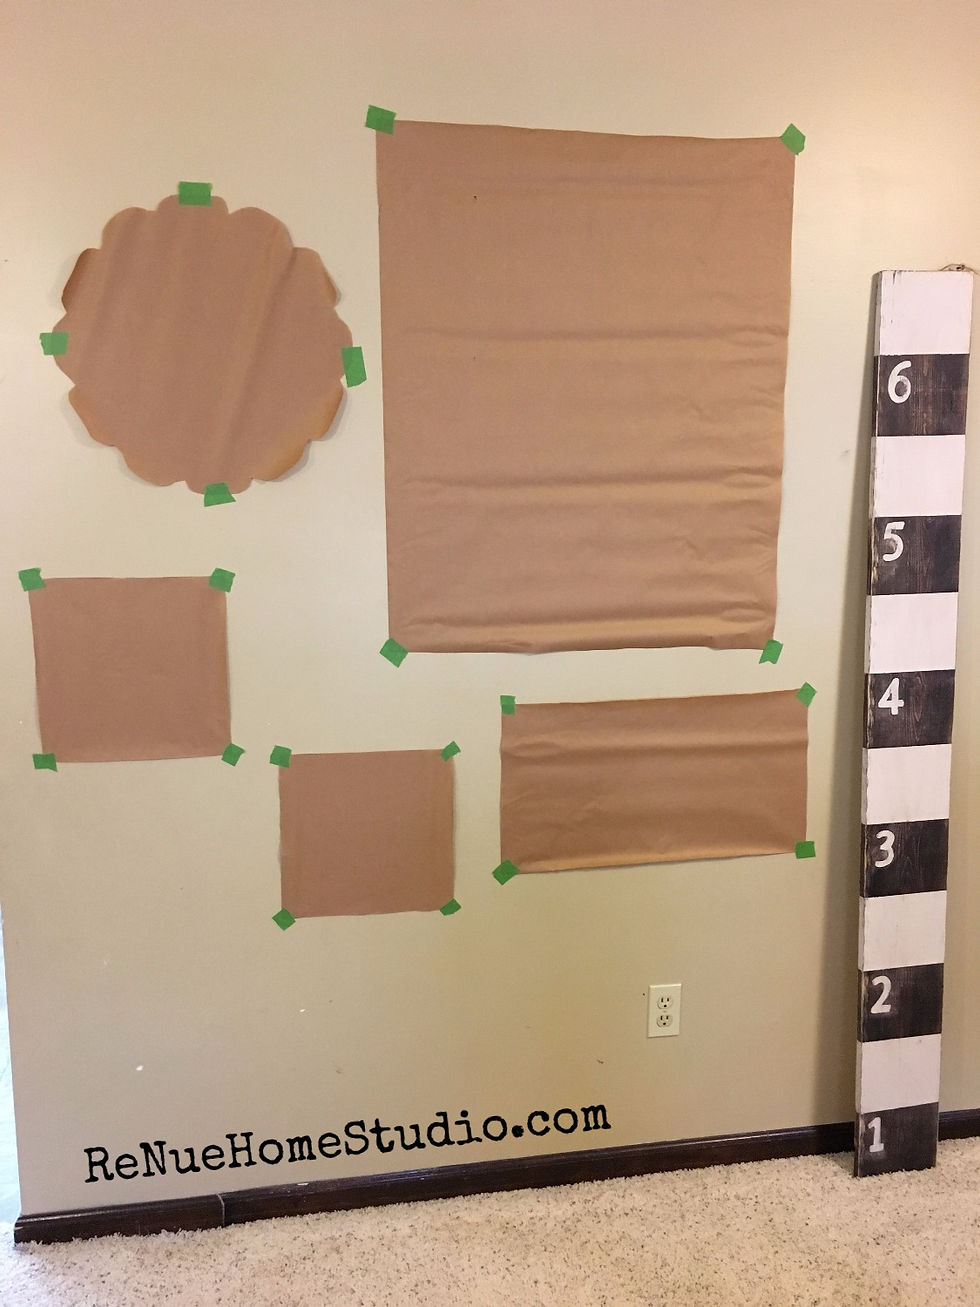
One of the easiest tips we can give you would be to take Craft Paper (newspaper or butcher's paper work well, too) and cut out the shapes of all your items. Simply lay your items down on your paper, trace around them and cut them out. Once you have all your elements, take Painter's Tape and and start playing with layout designs on your wall. It's that easy. Leave them for a day or two to see if that particular layout works for you. Start with your Anchor Pieces first, then add in the smaller items.

Once you've decided on a design, go ahead and hang your pieces. Use either small nails for light items or use Drywall Anchors with Screws for medium size items. If something is really heavy, make sure it's anchored into a stud. Getting a Wall Anchor Kit will have several of the items you will probably need, too. You can also use something like a Laser Level or a Digital Measuring Tape if you're really wanting to get exact measurements and spacing. By the way, if you're looking for a power drill, our favorite is the Makita. It has great torque and battery life.
We have a great line of Signs, Growth Rulers, Spool Wall Clocks, Chevrons and more that are perfect elements for a Gallery Wall. Check out our items on our website for purchase. If you're great at DIY projects, we also have a number of tutorials on our website where we can teach you how to make some of these items yourself. Look under the Tutorials tab at www.ReNueHomeStudio.com.
We'd love to see pics of your final projects. Send them to anna@renuehomestudio.com with "Gallery Wall" in the title. We'd love to post some of them on our Facebook page.
Blessings,


Comments